Tutorial on Selenium Locators: Discover how to pinpoint Web Components Using XPath in Selenium with Examples
On our last tutorial, we introduced an automation testing tool known as Firebug. We manually constructed an automation script using Firebug and its versatile features, and we also learned how to make the desired alterations to our script.
Recommended IPTV Service Providers
- IPTVGREAT – Rating 4.8/5 ( 600+ Reviews )
- IPTVRESALE – Rating 5/5 ( 200+ Reviews )
- IPTVGANG – Rating 4.7/5 ( 1200+ Reviews )
- IPTVUNLOCK – Rating 5/5 ( 65 Reviews )
- IPTVFOLLOW -Rating 5/5 ( 48 Reviews )
- IPTVTOPS – Rating 5/5 ( 43 Reviews )
In this tutorial, we will delve into the different categories of locators in Selenium and various methods for accessing them when developing test scripts. This tutorial aims to give an in-depth understanding of the different locator types.
This is the fifth tutorial in our series on Selenium Tutorials.
What Exactly is a Locator?
A locator can be understood as the unique identifier that distinguishes a web component on a webpage. Locators are the HTML properties of a web component that instruct Selenium on which web component action should be carried out.

The following are some of the most common types of web elements:
- Textbox
- Button
- Drop-down menu
- Hyperlink
- Checkbox
- Radio button
Here’s What You’ll Learn:
Types of Locators
Discovering these components has always been an intricate subject that necessitates a precise and efficient approach. The more optimized the locator, the more reliable the automation script becomes. All Selenium commands require locators to identify web elements. We have different types of locators to precisely single out these web elements.
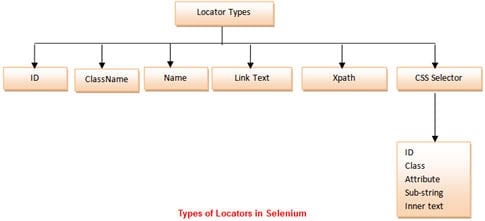
Let’s delve deeper into each one of them.
Before we scrutinize the locators, let us briefly introduce the application being tested. We will be employing “https://accounts.google.com/” to identify different web elements using different locator types.
Employing ID as a Locator
The most common method for pinpointing a web component is by utilizing its ID. The ID of every element is meant to be unique.

In this demonstration, we will connect with the “Email” textbox found in the login form on gmail.com.
Identifying a web element’s ID using Firebug
Step 1: Start the web browser (Firefox) and navigate to “https://accounts.google.com/”.
Step 2: Activate Firebug (either by striking the F12 key or through the tools menu).
Step 3: Click on the inspect icon to pinpoint the web component.
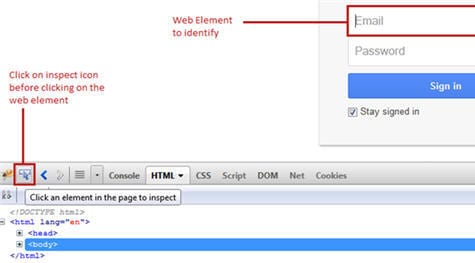
Step 4: Hover the cursor over the web component (in our case, the Email textbox) that we want to manipulate. Observe that in the Firebug section, the corresponding HTML tags are highlighted.
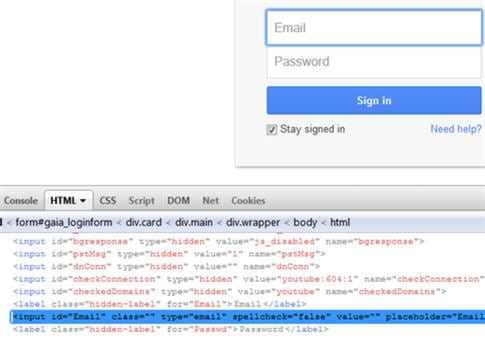
Step 5: Note down the ID attribute. We need to confirm whether the detected ID can uniquely and precisely locate the element or not.
Syntax: id = ID of the component
Our case has the ID “Email”.
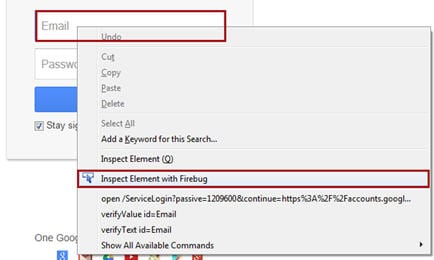
Alternative method:
You can skip Steps 2 to 4 and directly locate or examine the web component by right-clicking on the web component (Email Textbox) that we need to examine for its locator attribute and selecting the option “Inspect Element with Firebug”. The Firebug section will then unfold, and the corresponding HTML tag will be featured.
Test the Locator Attribute
Assuming that the browser is launched and redirected to “https://accounts.google.com/”.
Step 1: Activate Selenium IDE.
Step 2: Select the first row in the editor section.
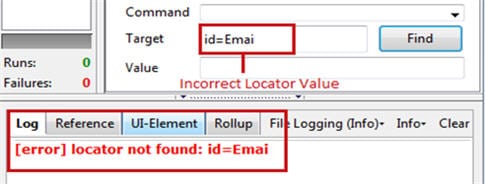
Step 3: Input “id=Email” in the target box.
Step 4: Hit the Find Button. Suppose the provided locator attribute is accurate. The Email textbox will be highlighted in yellow with a neon green border around the box. If the locator attribute is incorrect, an error notification will be printed in the log pane situated at the bottom of Selenium IDE.
Scenario 1: Locator Attribute = Correct

Scenario 2: Locator Attribute = Incorrect
Step 5: To further verify, you can test a “type” command against the given target by keying in a value in the “Value” field. If the execution of the command keys in the specified value in the Email textbox, it signifies that the derived locator attribute is accurate and functional.
Utilizing ClassName as a Locator
There’s a minimal difference between using an ID as a locator and employing the classname as a locator.
In this demonstration, we will connect with the “Need Help?” hyperlink located at the base of the gmail.com login form.
Identifying a web element’s classname using Firebug
Step 1: Locate or examine the web component (“Need help?” link in our case) by right-clicking on the web component whose locator attribute we need to examine and choosing the option “Inspect Element with Firebug”.
Step 2: Note down the classname attribute. We now have to validate whether the identified classname can uniquely and accurately locate the component.

<
h3>Employing Name as a Locator</